Content of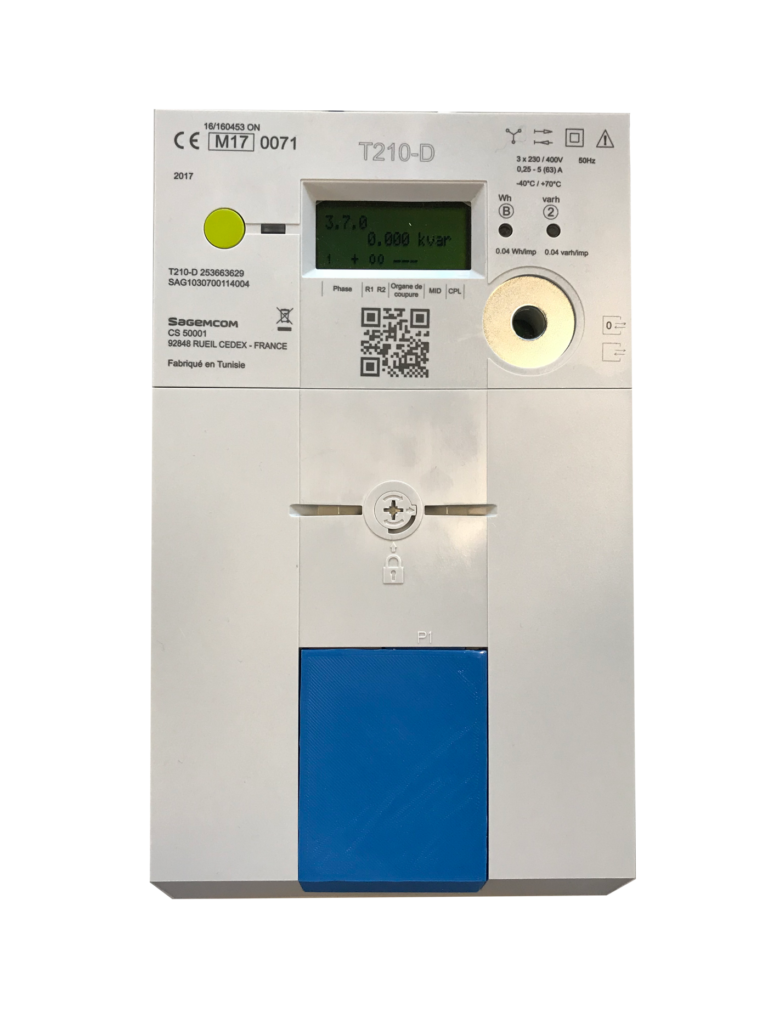
this Post:
- Introduction
- Smart meter in Luxembourg
- Developing a solution
- Conclusion
- Hardware solution
- Collaborate with us
Introduction
Motivation
 Luxembourg has seen a large-scale deployment of smart meters during the last few years, gathering power and energy consumption data. This can not only be used for a wide area of optimizations from an electricity distribution grid operator’s perspective, but each household could make use of this information as well. In the context of a smart home, energy-conscious living or plain simple curiosity, having access to the data allows for additional insight. Currently, there is no simple way to access the consumption values, which is why NEXXTLAB is developing solutions to promote the usage of said data.
Thanks
We would like to thank the authors of two projects, who made available their solutions to the public:
- Smarty DSMR Proxy (Python)
- SmartyReader (Hardware and Arduino)
In addition, we would like to thank Luxmetering GIE for their continuous work on the smart meter.
Smart meter in Luxembourg
 The Luxembourgish smart meter (also called Smarty), produced by Sagemcom (model T210-D), is being installed since 2016 and most buildings should be upgraded until 2020. One of the advantages of the smart meter is to remotely read your consumption, which avoids making an appointment with a technician at the end of the settlement period. This feature is soon entering a testing phase for several suppliers. Another gain is aimed towards the end-user – access to one’s own power and energy consumption. This information can be used in multiple ways: be it as an energy-conscious person wanting to keep track of their footprint, a smart-home enthusiast who would like to have more input for automated intelligent decision making, or simply looking at the consumption out of curiosity.
While most of the smart meter’s inner workings are hidden to the end-user, the P1 port is freely available. On the front side of the smart meter, you should be able to find a green cover which can be removed by sliding it down. Underneath you should see a RJ11 (a 6-pin telephone jack) female socket – this is the P1 port. Right next to it there are two additional connectors, hidden behind the sealed cover. They are called R1 and R2 and are accessible to authorized people only. These relays, once connected, allow to the distribution grid operator to temporarily shut down big consumers in case of grid overload or power imbalance.
P1 Port
The P1 port allows the end-users access to their own consumption data. To ensure the safety of the smart meter, P1 is optically decoupled and read-only. The required physical connector is a RJ11 plug, which has five of the six lines in use. The details can be looked up in the specification on page 6. To sum up, 1 line acts as a +5V power supply, with up to 250 mA; 1 line is the ground for the power supply, and 3 lines handle the data traffic. One of the data lines acts as the data request, which must be set to high (+5V) in order to have the smart meter send its data. The energy consumed by any device powered via the P1 port is not included in the accounted consumption of the smart meter, which means you have free access to your energy data.
While the Dutch model serves as basis considering the Dutch Smart Meter Requirements (DSMR) standard, as well as the P1 specification, the smart meter deployed in Luxembourg adds encryption on top of that. All data output is encrypted using the AES128-GCM algorithm, with each smart meter having a different key to decrypt the messages (also called telegrams).
Linked resources:
DSMR: https://www.netbeheernederland.nl/_upload/Files/Slimme_meter_15_91e8f3e526.pdf
P1: https://www.netbeheernederland.nl/_upload/Files/Slimme_meter_15_a727fce1f1.pdf
Luxembourgs’ Smarty: https://www.nexxtlab.lu/download/453/
Developing a solution
 Even though the smart meter allows every end-user automated access to their own energy data, provided they have the decryption key, it still appears to be a major hurdle for any non-tech-savvy person. And that’s perfectly fine!
We at NEXXTLAB would like to offer help to people interested in evaluating their energy data, that don’t have the time or know-how to do so. We believe the smart meter will enable for instance a lot of smart homes to evolve even further, once the own electrical consumption can be taken into consideration. These are the main reasons why we started two projects around the smart meter.
The first project is an open source Golang project hosted on GitHub, called Go Smarty Reader. Golang has as main advantage that it compiles to a lot of different platforms (operating systems and architectures) and requires only a minor setup to run a first example. The Getting started subsection will have more information about your first steps with Go Smarty Reader.
The second project is called Smarty Dongle, a product which has reached prototyping stage and will offer a more complete solution to end-users, especially those who do not wish to tinker their own hardware but simply want an easy access to their power and energy consumption. The idea is pretty straight forward: have a micro-controller connected to the smart meter and make the data available to the end-user after minimal setup.
Architecture
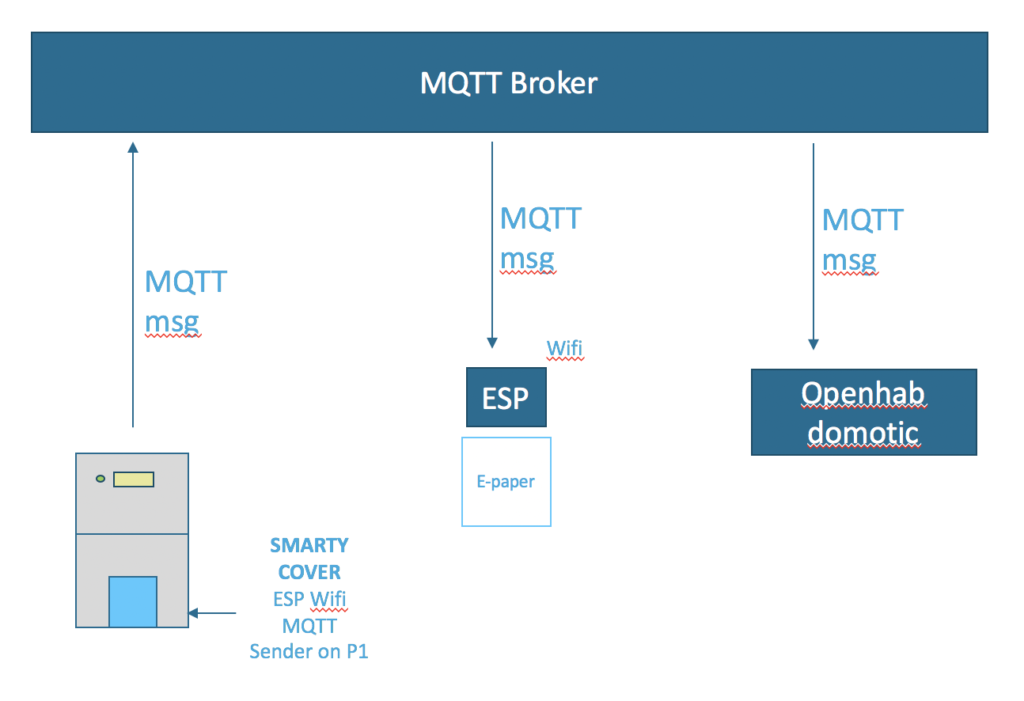 Both projects are built with the same architecture in mind. Make use of the P1 port to retrieve the data, after which you can optionally decrypt them and/or publish the values to a MQTT broker. The decryption step could also take place only after retrieving the encrypted data package from your chosen MQTT broker for instance, or you could avoid MQTT altogether and plain simply display the values in your console. MQTT is a popular protocol in the domain of smart-home and acts as a communication channel between multiple internet-of-things devices. There are simple to use libraries for almost every major programming language, or your smart-home tool might even support it out of the box. This requires minimal setup, after getting your decryption key from your electricity grid operator, and the data will be available right away on the MQTT broker for several smart-home tools, future NEXXTLAB projects, or your very own!
Flexibility is the key, as one fixed solution will not cater to individual needs, and we would like to make the smart meter data as accessible as possible. If you have further suggestions, please let us know!
Software solution
Sour ce code
The source code for Go Smarty Reader can be found at our GitHub repository.
License
Go Smarty Reader is licensed under the GPLv3 License – see the license file on GitHub for details.
External libraries
Getting started
Prerequisites
Before you will be able to run Go Smarty Reader you will need to take care of the following tasks:
- Ask for your energy grid operator for your smart meter P1 key.
You should write an email to your grid operator asking for your key. The email should include your name, address and your smart meter identification (on the left front side of your smart meter, second line below the green button, starts with SAG followed by 13 digits).
Find your grid operator contact in the list below. As alternative you may also ask your energy supplier.- Creos: info@creos.net
- Diekirch: smarty@diekirch.lu
- Electris (Mersch): smarty@electris.lu
- Ettelbruck: sive@ettelbruck.lu
- Sudstroum (Esch-sur-Alzette): backoffice@sudstroum.lu
- Get hold of a cable in order to connect your machine to the smart meter.
The smart meter has a RJ11 plug and the other end of the cable depends on your needs. If have the possibility to use USB, then you might want look for a P1 Cable (Dutch name: Slimme Meter Kabel P1). Another possibility to wire it yourself as seen on weigu.lu. - Install and properly set up Golang on your machine.
This does not have to be the machine on which the software will run. Only the machine you use to build the project requires Golang. Using Golang’s vast cross-compilation options you will be able to make Go Smarty Reader on almost all major platforms.
Getting the source code
Running the following command in your terminal will download Go Smarty Reader to your Golang projects folder ($GOPATH):
go get github.com/NEXXTLAB/go-smarty-reader
Now you will find a copy of the project on your machine. Next step is to make sure you have all required dependencies. If you happen to have dep installed you can simply run dep ensure, else you can run the following four commands:
go get https://github.com/eclipse/paho.mqtt.golang

go get https://github.com/golang/glog

go get https://github.com/basvdlei/gotsmart

go get https://github.com/tarm/serial
Now you should be set up to compile and run Go Smarty Reader !
Running the examples
Point your terminal to the project folder of Go Smarty Reader and enter the following command:
go run ./cmd/OnlineDecryption/main.go -key yourKey -device yourInterface -stderrthreshold=INFO
The command-line arguments in use are:
- key: your device specific decryption key
- device: the interface on which the smart meter is connected to your target platform
- stderrthreshold: allows to adjust the console output of glog, see here for more details
The key should be, as mentioned earlier, requested from your electricity grid operator. To set the device argument, you will need to find the correct interface. Here a quick How-To:
- Windows: open your Device Manager, expand the Ports section, find the correct device and write down the COM port (e.g. COM8)
- Linux (& Mac OS X): open your terminal and run dmesg. Plug in your P1 cable and write down the device name (e.g. /dev/ttyUSB2)
If everything works out as expected you should be able to see every 10 seconds a new decrypted telegram in your terminal. Instead of running OnlineDecryption you may also want to look at the other examples inside of the cmd folder.
Conclusion
In order to promote the usage of smart meter data, NEXXTLAB has developed and published a tool for the acquisition of said data. Go Smarty Reader allows you to monitor your energy and power consumption, without in-depth knowledge of serial communication or the encryption specifics. While for smart home enthusiasts the data may allow for some major improvements in their setup, other people might just be satisfied looking at a small screen fixed at their fridge, displaying the daily energy consumption. Maybe you want to see what changes in your behaviour have the biggest impact? Or if you happen to have different electricity prices during day and night, try running the dishwasher or washing machine overnight and see the difference.
We are fully aware that Go Smarty Reader still targets a very specific group of people and the offered solution might be too complicated for most people, which is why we provide the results of an additional project – the Smarty Dongle.
Hardware solution
 The second solution has reached the prototype phase and awaits industrial production after additional polishing. It will offer a product geared towards people interested in their own consumption, but lacking the time or knowledge to get access to it.
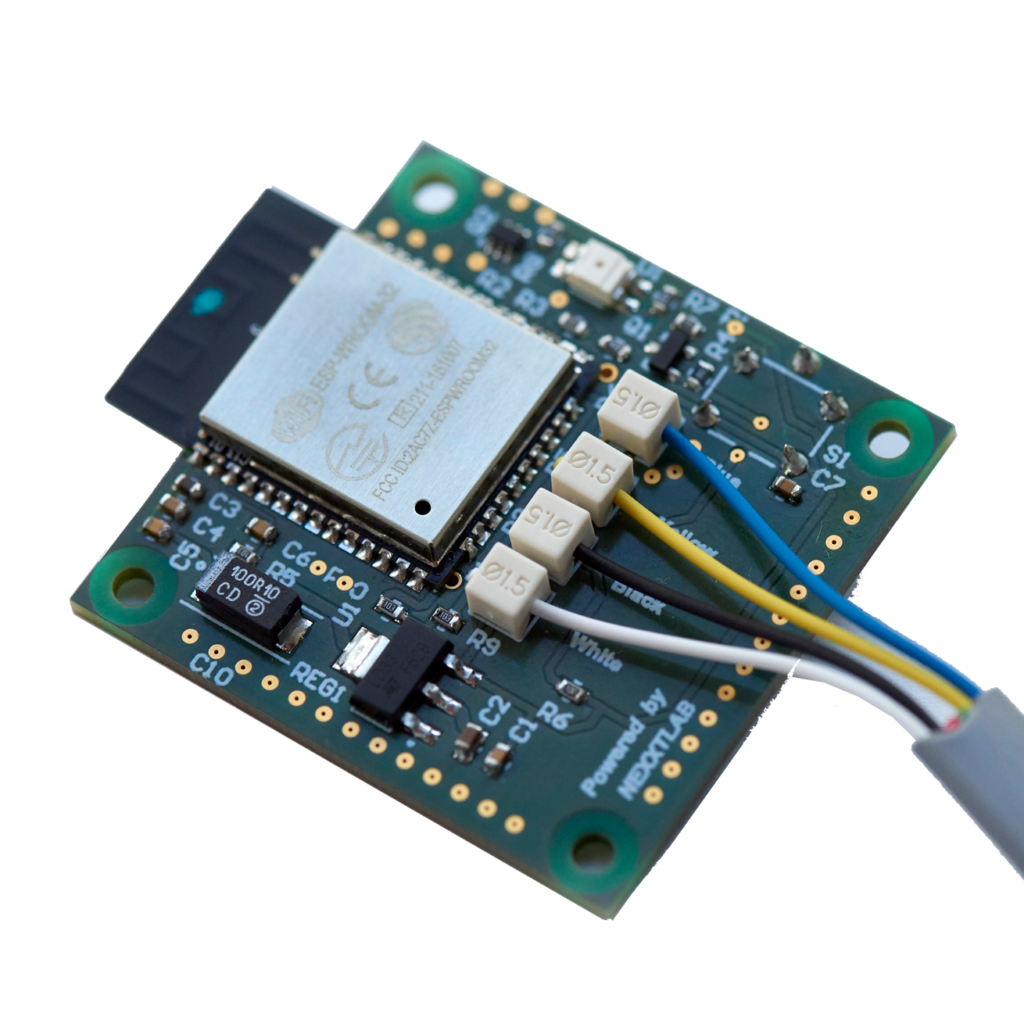
Smarty Dongle is based on the ESP32-WROOM-32 micro-controller by Espressif and a custom printed circuit board. The firmware has a few additional features compared to the Go Smarty Reader project, which supports the convenience aspect, such as the possibility of over the air updates if an internet connection is available.
Installing the dongle will be as easy as removing the default green cover on your smart meter and replace it with the blue one supplied with the dongle. After that the micro-controller is almost ready to start it’s task. A quick configuration, such as your smart meter P1 key, your WiFi network & password and you should be good to go!
We are looking for a collaboration with other businesses, interested in developing a business case and services around the product provided.
Collaborate with us!
 You are welcome to contribute to helping other people getting access to their smart meter data. Please contact us if you have suggestions, feedback, or are in need of help.
- GitHub issues
- Email: smarty@nexxtlab.lu
If you happen to find yourself improving parts of Go Smarty Reader do not hesitate to send us a pull request on GitHub.